Monday 26 October 2015

Routing Loop, Split Horizon and Route poisoning

Routing Loops

A routing loop is a situation where a packet keeps getting routed between two or more routers because of problems in the routing table. In case of distance vector protocols, the fact that these protocols route by rumor and have a slow convergence time can cause routing loops.
Split Horizon
solution to the routing loop problem is called split horizon. This reduces incorrect routing
information and routing overhead in a distance-vector network by enforcing the rule that
routing information cannot be sent back in the direction from which it was received.
In other words, the routing protocol differentiates which interface a network route was
learned on, and once this is determined, it won’t advertise the route back out that same interface.

Route Poisoning
Another way to avoid problems caused by inconsistent updates and stop network loops is route
poisoning. For example, when Network 5 goes down, Router E initiates route poisoning by
advertising Network 5 as 16, or unreachable (sometimes referred to as infinite).
This poisoning of the route to Network 5 keeps Router C from being susceptible to incorrect
updates about the route to Network 5. When Router C receives a route poisoning from Router E,
it sends an update, called a poison reverse, back to Router E. This ensures all routes on the segment
have received the poisoned route information.
Routing Information Protocol .
Route poisoning and split horizon create a much more resilient and dependable distancevector
network than we’d have without them, and they serve us well in preventing network

loops.


Hold-down

A hold down prevents regular update messages from reinstating a route that is going up and
down (called flapping). Hold down  prevent routes from changing too rapidly by allowing time for either the downed route to come back up or the network to stabilize somewhat before changing to
the next best route. These also tell routers to restrict, for a specific time period, changes that
might affect recently removed routes.
When a router receives an update from a neighbor indicating that a previously accessible network
isn’t working and is inaccessible, the hold down timer will start. If a new update arrives
from a neighbor with a better metric than the original network entry, the hold down is removed
and data is passed. But if an update is received from a neighbor router before the hold down
timer expires and it has an equal or lower metric than the previous route, the update is ignored
and the hold down timer keeps ticking. This allows more time for the network to stabilize before

trying to converge.
Hold downs use triggered updates that reset the hold down timer to alert the neighbor routers
of a change in the network. Unlike update messages from neighbor routers, triggered updates
create a new routing update that is sent immediately to neighbor routers because a change was
detected in the internetwork.
There are three instances when triggered updates will reset the hold down timer:
The hold down timer expires.
Another update is received with a better metric.
A flush time, which is the time a route would be held before being removed, removes the
route from the routing table when the timer expires.

Dynamic Routing

Dynamic Routing
Dynamic routing is when protocols are used to find networks and update routing tables on routers.
 A routing protocol defines the set of rules used by a router when it communicates routing information between neighbour routers.

Routing Protocols

RIP
EIGRP
OSPF
IS-IS
BGP

Routing Protocol Basics
There are some important things you should know about routing protocols before getting
deeper into RIP. Specifically, you need to understand administrative distances, the three different
kinds of routing protocols, and routing loops. We will look at each of these in more detail
in the following sections.

Administrative Distances
The administrative distance (AD) is used to rate the trustworthiness of routing information
received on a router from a neighbour router. An administrative distance is an integer from 0 to
255, where 0 is the most trusted and 255 means no traffic will be passed via this route.
If a router receives two updates listing the same remote network, the first thing the router
checks is the AD. If one of the advertised routes has a lower AD than the other, then the route
with the lowest AD will be placed in the routing table.
 The advertised route with the lowest metric will be placed in the routing table. But if
both advertised routes have the same AD as well as the same metrics, then the routing protocol
will load-balance to the remote network.

Default Administrative Distances

Connected interface                       0
Static route                                     1
EIGRP                                            90
IGRP                                              100
OSPF                                              10
RIP                                                 120
External EIGRP                             170

Unknown                                       255 (Invalid Route)

Thursday 22 October 2015

How to enable default routing on cisco router

Default Routing

We use default routing to send packets with a remote destination network not in the routing
table to the next-hop router. You can only use default routing on stub networks those with
only one exit path out of the network.
To configure a default route, you use wildcards in the network address and mask locations
of a static route.


In this topology we are going to configure Default Routing on R1
To configure default routing on R1 command is :- 

R1(config)#ip route 0.0.0.0 0.0.0.0 10.1.1.2

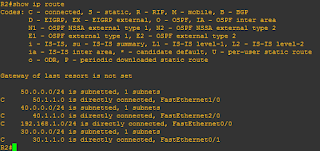
To check routing table command is 

R1#show ip route


Wednesday 21 October 2015

Static Routing

Static Routing
Static routing occurs when you manually add routes in each router’s routing table.  Static routing has the following benefits:
No CPU overhead
No bandwidth usage between routers
Only Administrator can choose allowed network
Static routing has the following disadvantages:
Administrator must really understand the internetwork and how each router is connected
in order to configure routes correctly.
Administrator has to add a route to it on all Routers manually.
Not feasible in large networks because maintaining it would be a full-time job in itself
Command Syntax
ip route [destination_network] [mask] [next-hop_address or exitinterface]
[administrative_distance] [permanent]
IP route:-  The command used to create the static route.

Destination network: - The network you’re placing in the routing table.

Mask: - The subnet mask being used on the network.

Next-hop address:-The address of the next-hop router that will receive the packet and forward
it to the remote network.

Exit interface: - You can use it in place of the next-hop address if you want, but it’s got
to be on a point-to-point link, such as a WAN. This command won’t work on a LAN such
as Ethernet.

Administrative distance :-  By default, static routes have an administrative distance of 1 (or
even 0 if you use an exit interface instead of a next-hop address). You can change the default
value by adding an administrative weight at the end of the command.

Permanent  :-If the interface is shut down, or the router can’t communicate to the next-hop
router, the route will automatically be discarded from the routing table. Choosing the permanent
option keeps the entry in the routing table no matter what happens.

Example:-
Router(config)#ip route 172.16.3.0 255.255.255.0 192.168.2.4

 The ip route command tells us simply that it is a static route.
 172.16.3.0 is the remote network we want to send packets to.
 255.255.255.0 is the mask of the remote network.

 192.168.2.4 is the next hop, or router, we will send packets to.


Default Routing

We use default routing to send packets with a remote destination network not in the routing
table to the next-hop router. You can only use default routing on stub networks those with
only one exit path out of the network.
To configure a default route, you use wildcards in the network address and mask locations
of a static route.


In this topology we are going to configure Default Routing on R1
To configure default routing on R1 command is :- 

R1(config)#ip route 0.0.0.0 0.0.0.0 10.1.1.2

To check routing table command is 

R1#show ip route


Thursday 15 October 2015

Routing :- Routing :- Routing is used for taking a packet from one device and sending it through the network to another device on a different network. The logical network address of the destination host is used to get packets to a network through a routed network, then the hardware address of the host is used to deliver the packet from a router to the correct destination host.

To be able to route packets, a router must know, at a minimum, the following:
 ·  Destination address

·   Neighbour routers from which it can learn about remote networks 

· Possible routes to all remote networks

· The best route to each remote network

 · How to maintain and verify routing information


The router builds a routing table that describes how to find the remote networks. If a network
is directly connected, then the router already knows how to get to it. If a network isn’t
Connected, the router must learn how to get to the remote network in two ways: by using static
Routing, meaning that someone must hand-type all network locations into the routing table, or
Through something called dynamic routing.


There are three types of routing

1.       Static
2.       Default

3.       Dynamic

Windows 10 New Features

Microsoft has launched its new operating system "Windows 10".
Now it is free for existing Microsoft existing users. People who are using windows 7 can upgrade to Windows 10 for free.

Today I'am going to introduce some cool and new Windows 10 Features.

1. Start Menu :- Windows 10 comes with new and stylish start menu, which contain more feature than windows 7. Start menu was removed from Windows 8.


2. Web Store :- Windows 10 Web store contain a huge collection of free and paid application.


3. Cortana :- Cortana is a virtual assistant that can help you find all online and hard drive information.


4. Edge Browser :- Window 10 replaced Internet Explorer with new "Edge" Browser. Edge Browser provide better speed and web slickness.


5. Task Viewer :- Windows 10 contain new running task viewer.


6. Action Center :- Find complete system notification on single place


7. Improved Graphics:- Windows 10 has very good looking user interface.
8.Speed :- Speed is the main feature of windows 10. Boot and shutdown time is very fast.

Saturday 3 October 2015

Router Passwords

Setting Passwords: - There are five passwords used to secure your Cisco routers: console, auxiliary, telnet (VTY), enable password, and enable secret.

Enable Passwords
You set the enable passwords from global configuration mode like this:

Router(config)#enable ?

last-resort :- Define enable action if no TACACS servers
respond

Password:-  Assign the privileged level password

Secret:-  Assign the privileged level secret

use-tacacs:- Use TACACS to check enable passwords

The following points describe the enable password parameters:

Last-resort:-  Allows you to still enter the router if you set up authentication through a TACACS
server and it’s not available. But it isn’t used if the TACACS server is working.

Password :- Sets the enable password on older, pre-10.3 systems, and isn’t ever used if an enable
secret is set.

Secret :-  encrypted password that overrides the enable password if it’s set.

Use-tacacs This tells the router to authenticate through a TACACS server. It’s convenient if you
have anywhere from a dozen to multitudes of routers, because, well, would you like to face the fun
task of changing the password on all those routers? If you’re sane, no, you wouldn’t. So instead,
just go through the TACACS server, and you only have to change the password:

Router(config)#enable secret cisco        

User mode password:- User-mode passwords are assigned by using the line command:

Router(config)#line ?

<0-70> First Line number
aux Auxiliary line

console Primary terminal line

tty Terminal controller

vty Virtual terminal


Auxiliary Password

To configure the auxiliary password, go into global configuration mode and type line aux ?.

 Router#config t

Enter configuration commands, one per line. End with CNTL/Z.

Router(config)#line aux ?
<0-0> First Line number

Router(config)#line aux 0

Router(config-line)#login

Router(config-line)#password cisco

It’s important to remember the login command, or the auxiliary port won’t prompt for
Authentication.                                               


Console Password

To set the console password, use the line console 0 command.  

Router(config)#line console 0

Router(config-line)# password cisco1

Router(config-line)# login


Additional Commands

Router(config)#line con 0

Router(config-line)#exec-timeout ?
<0-35791> Timeout in minutes

Router(config-line)#exec-timeout 0 ?
<0-2147483> Timeout in seconds
<cr>

Router(config-line)#exec-timeout 0 0

Router(config-line)#logging synchronous

The exec-timeout 0 0 command sets the timeout for the console EXEC session to zero, which basically means to never time out. The default timeout is 10 minutes

Logging synchronous stops annoying console messages from popping up and disrupting the input you’re
trying to type. The messages still pop up, but you are returned to your router prompt without your input interrupted.


Telnet Password

To set the user-mode password for Telnet access into the router use the following command

Router(config-line)#line vty 0 ?
<1-4> Last Line Number
<cr>

Router(config-line)#line vty 0 4

Router(config-line)# password cisco2

Router(config-line)# login


Encrypting Your Passwords

By default only secret password is encrypted, all other passwords are in plain text. To encrypt all passwords we have use following command

Router(config)#service password-encryption